
The right lighting can turn a basic desk with a monitor into a full-blown command center. It’s the difference between playing in a bland room and stepping into an environment that reacts to every headshot, every victory royale, every perfectly timed ultimate. LED lights aren’t just about aesthetics, they’re about creating a space that pulls you deeper into the game and keeps you comfortable during those marathon sessions that stretch into the early morning hours.
In 2026, gaming LED technology has evolved beyond simple static RGB strips. Modern options sync with your game’s audio, respond to on-screen action, and integrate seamlessly with existing RGB ecosystems from Razer, Corsair, and ASUS. Whether you’re building your first setup or upgrading an existing battle station, understanding LED options and placement strategies makes the difference between a setup that looks thrown together and one that feels purpose-built for performance and immersion.
Key Takeaways
- LED lights for gaming setup enhance immersion and reduce eye strain by creating ambient lighting that syncs with games and matches on-screen action in real time.
- Bias lighting placed behind monitors at 10% brightness with a neutral 5,500K–6,500K color temperature measurably reduces eye fatigue and improves reaction times during extended gaming sessions.
- RGBIC strips offer the best balance of visual complexity and affordability for gaming setups, allowing independent color zones without the cost and complexity of fully addressable RGB systems.
- Plan your LED lighting layout using a three-layer approach—background, mid-ground, and foreground—to create depth and visual hierarchy rather than randomly placing strips throughout your space.
- Ecosystem integration with Razer Synapse, Corsair iCUE, or ASUS Aura Sync enables unified control across keyboards, mice, and LED lights, but lock-in limits flexibility compared to brand-agnostic solutions like Govee or Philips Hue.
- Common mistakes like over-saturation, poor cable management, and mounting strips at eye level diminish results; start with bias lighting and desk underglow, then expand based on your space and preferences.
Why LED Lighting Matters for Your Gaming Setup
Lighting isn’t just decoration. It directly impacts how you experience games and how your body responds to extended play sessions.
Enhanced Immersion and Atmosphere
Dynamic lighting transforms the physical space around a monitor into an extension of the game world. When ambient LEDs shift from cool blue during underwater sequences to warm orange during desert combat, the brain registers those environmental cues even in peripheral vision. This creates a wider sensory experience than the monitor alone can deliver.
Modern LED systems with game sync capabilities react to in-game events in real time. Philips Hue and Govee both offer game-responsive modes in 2026 that pulse red when taking damage or flash white during explosions. The effect is subtle but measurable, many competitive players report feeling more spatially aware when their lighting matches the game’s intensity, even if they can’t articulate exactly why.
Atmosphere matters for content creators too. Streamers use controlled lighting to establish visual identity and maintain viewer engagement. A well-lit background with intentional color choices looks professional on camera and helps smaller channels compete with established creators on production value alone.
Reduced Eye Strain During Long Gaming Sessions
Bias lighting, the technique of placing soft light behind a monitor, reduces the contrast between a bright screen and a dark room. This contrast forces the eye’s iris to constantly adjust between looking at the display and glancing away, leading to fatigue after a few hours. By adding a gentle backlight, the pupil maintains a more consistent size, reducing strain.
The ideal bias light sits at around 10% of the monitor’s brightness and uses a neutral color temperature between 5,500K and 6,500K. Pure white works best for color accuracy, but many gamers prefer a slight blue tint (around 7,000K) to match the cooler tones of most game UIs. RGB strips set to static white serve this purpose, though dedicated bias lighting kits often include diffusers for more even light distribution.
Eye strain isn’t just about comfort, it affects performance. Studies on visual fatigue show reaction times degrade measurably after three hours of screen time in poor lighting conditions. The competitive edge lost to tired eyes might mean the difference between clutching a round and whiffing a crucial shot.
Types of LED Lights for Gaming Setups
Different LED types serve different purposes. Choosing the right combination depends on your space, budget, and how much control you want over the final look.
RGB Strip Lights
RGB strips remain the most versatile and cost-effective option for most gaming setups. These flexible adhesive strips come in various lengths (typically 6.5 to 32 feet) and can be cut at designated points to fit exact measurements. They stick to the back of desks, monitors, shelves, and bed frames, basically any clean surface.
Standard RGB strips contain LEDs that all display the same color at once. They’re perfect for general ambient lighting and bias lighting but lack the visual complexity of more advanced options. Expect to pay $15-$40 for quality non-branded strips, or $50-$80 for ecosystem-integrated versions from Corsair iCUE or Razer Chroma.
Installation is straightforward: peel, stick, connect to a controller, and plug into power. Most include a remote for basic control, though app-based control offers more precise color tuning and timing options.
Smart LED Bulbs and Panels
Smart bulbs replace standard light fixtures and offer whole-room color control. Philips Hue, LIFX, and Nanoleaf dominate this category in 2026. They’re ideal for overhead lighting and complement strip lights by filling vertical space with color.
Nanoleaf Shapes and Govee Glide represent the panel category, modular hexagons, triangles, or bars that mount to walls in custom patterns. Each panel section can display a different color, creating geometric light patterns that shift and flow. They’re more expensive than strips (panels start around $200 for starter kits) but provide a distinctive aesthetic that many popular gaming setup configurations incorporate for visual impact.
Smart integration is the key advantage here. These lights connect via Wi-Fi and work with Alexa, Google Home, and dedicated gaming ecosystems to enable voice control and automation.
Bias Lighting for Monitors
Dedicated bias lighting refers to LED strips specifically designed for monitor backlighting. Unlike general RGB strips, these often include diffusers or specialized LED spacing to create even, shadow-free illumination.
The MediaLight Mk2 and BenQ ScreenBar Halo represent two approaches. MediaLight offers adhesive strips calibrated to precise color temperatures for color-critical work but also work well for gaming. The ScreenBar Halo is a monitor-mounted light bar that illuminates both the wall behind the screen and the desk surface in front, reducing overall room contrast.
For multi-monitor setups, continuous bias lighting across all displays creates visual cohesion and prevents dark gaps between screens from creating additional eye strain.
LED Light Bars and Tubes
Light bars and tubes add dimensional lighting that strips can’t match. Products like Govee Lyra and Philips Hue Play Gradient Lightstrip project light outward from a fixed point, creating depth and shadow play.
Tubes work well as upward-facing accent lights placed behind monitors or on desk corners. They cast light onto walls and ceilings, creating an indirect glow that’s less harsh than direct strip lighting. Many gaming setups in 2026 use light bars as vertical elements to break up the horizontal lines of desks and monitors.
Light bars range from $30 for basic single-color options to $150+ for premium RGBIC models with music sync and ecosystem integration.
Key Features to Look for in Gaming LED Lights
Not all LED lights are created equal. Specific technical features separate basic accent lighting from truly integrated gaming illumination.
RGB vs. RGBIC vs. Addressable LEDs
RGB lights contain red, green, and blue diodes that mix to create colors, but all LEDs on the strip display the same color simultaneously. They’re simple and affordable but limited in visual complexity.
RGBIC (Independent Control) lights allow different sections of the strip to display different colors at the same time. A single strip can show a rainbow gradient or flowing color patterns. The controller determines how many independent zones exist, budget RGBIC strips might have 5-10 zones, while premium options offer 50+.
Addressable RGB (often called ARGB or Digital RGB) gives individual control to every single LED. This enables pixel-level precision for complex animations, reactive lighting that ripples across the strip, and game sync effects that pinpoint exact screen regions. Addressable strips require compatible controllers (often Arduino-based or proprietary gaming brand controllers) and cost 2-3x more than standard RGB.
For gaming setups, RGBIC represents the sweet spot, enough visual interest for dynamic effects without the complexity and cost of full addressable systems. Competitive gamers who prioritize function over form often stick with simple RGB for bias lighting, saving budget for peripherals that directly impact performance.
Smart Integration and Ecosystem Compatibility
Ecosystem integration determines whether your lights work as isolated accessories or as part of a unified RGB environment. Razer Synapse 3, Corsair iCUE, ASUS Aura Sync, and MSI Mystic Light represent the major gaming ecosystems in 2026.
When all components sync to one ecosystem, a single software interface controls everything, keyboard, mouse, case fans, RAM, GPU, and LED strips all respond to unified lighting profiles. This creates cohesive effects like color waves that travel across every component or reactive lighting where all RGB elements pulse together during critical game moments.
The tradeoff is ecosystem lock-in. Razer Chroma strips work best with other Razer gear, and mixing brands often means running multiple software suites or accepting that some components won’t sync perfectly. Reviewers at PCMag consistently note that single-ecosystem builds offer the smoothest experience, even if component selection becomes more limited.
For platform-agnostic setups, Govee and Philips Hue work across brands through app control and smart home integration, though they won’t sync as tightly with gaming peripherals as native ecosystem products.
Music and Game Sync Capabilities
Music sync uses a microphone (built into the controller or your device) to detect audio frequencies and change lighting in response. Bass-heavy music triggers one color, mid-tones another, creating a light show that pulses with your playlist or in-game soundtrack.
Game sync (also called Ambilight or screen mirroring) goes further by analyzing what’s displayed on screen and extending those colors onto your LEDs. When your game shows a blue sky on the left and green forest on the right, the corresponding LEDs reflect those colors, effectively expanding the screen beyond its physical borders.
Implementation varies. Govee’s DreamView uses a camera mounted on the monitor to read screen content. Razer Chroma integrates directly with supported games (over 250 titles as of early 2026) for native lighting effects programmed by developers. SignalRGB emerged in 2024 as third-party software that unifies multiple ecosystems and adds game sync to hardware that doesn’t natively support it.
These features sound gimmicky until you experience them properly configured. Screen sync for atmospheric exploration games like Red Dead Redemption 3 or The Elder Scrolls VI genuinely enhances immersion. For competitive FPS titles, most players disable effects to minimize distraction.
How to Plan Your Gaming Setup Lighting Layout
Randomly placing LED strips wherever they fit creates visual clutter. Intentional planning creates depth and professionalism.
Mapping Your Gaming Space
Start by measuring the areas you want to light. Key measurement points include:
- Monitor perimeter: The exact length around your monitor’s back edge for bias lighting
- Desk underside: Front edge and side edges if you want underglow
- Shelf lengths: Individual shelves or continuous runs across multiple shelves
- Wall accent areas: Vertical or horizontal runs for architectural lighting
Sketch a top-down view of your desk and surrounding area. Mark power outlet locations, LED strips need power every 16-32 feet depending on the product, and extension cables or additional power supplies add to the final cost and complexity.
Identify your focal point, usually the monitor or monitor array. Lighting should draw the eye toward this central element rather than competing with it. Secondary lighting zones (shelves, walls, ceiling) support the focal point without overwhelming it.
Consider cable management during planning. LED strip controllers, power supplies, and connection cables create clutter if not routed properly. Plan for cable channels, adhesive clips, or desk grommets before installation begins.
Creating Depth with Layered Lighting
Layered lighting uses multiple light sources at different distances from walls and surfaces to create depth. A flat, evenly lit room looks one-dimensional on camera and in person.
Three-layer approach:
- Background layer: Lights mounted high or far from the viewpoint, ceiling strips, wall washers, or tall light bars that illuminate the back wall
- Mid-ground layer: Desk-level lighting like monitor bias lights, shelf strips, or mid-height panels that define the main gaming area
- Foreground layer: Under-desk lighting or low-mounted tubes that create ground-level ambiance
Each layer should use different intensities. Background lighting can be brighter and more diffused, mid-ground lighting more focused, and foreground lighting subtle. This creates visual hierarchy and prevents the setup from looking flat.
Color coordination across layers matters. Three different colors on three layers creates chaos. Better approach: use variations of the same hue (light blue background, medium blue mid-ground, deep blue foreground) or complementary colors (purple background, blue mid-ground, subtle white foreground) based on color theory.
Many streamers and content creators use layered lighting to create depth in their background, making even small spaces look larger and more professional on camera.
Top LED Light Placement Ideas for Maximum Impact
Specific placement locations create different effects. These tried-and-tested positions work for most gaming setups.
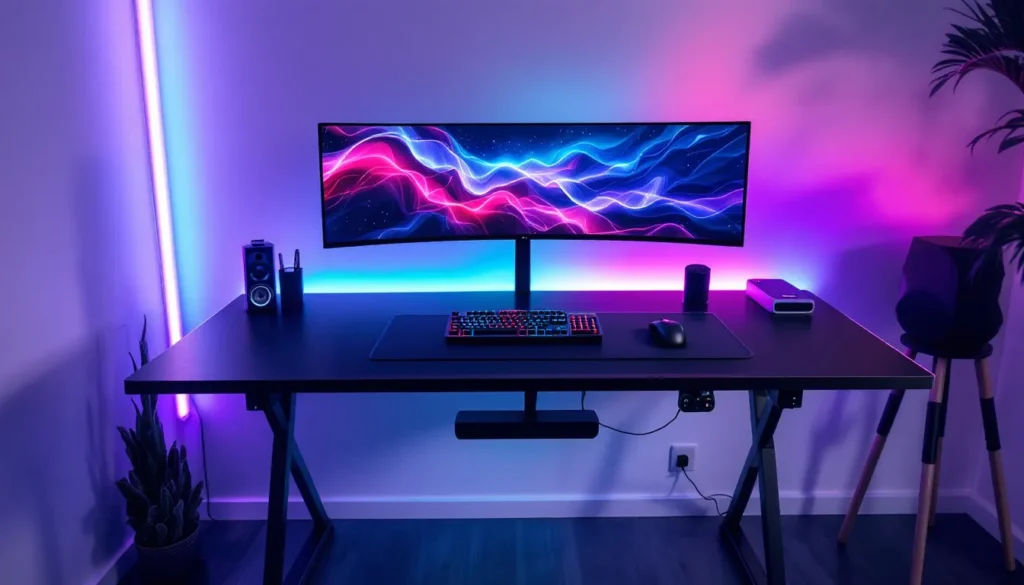
Behind the Monitor and Desk
Behind the monitor remains the single most effective placement for both function and aesthetics. This creates the bias lighting effect that reduces eye strain while making the monitor appear to float when viewed from the front.
For proper bias lighting, mount the strip along the monitor’s back edge, centered vertically. The light should project onto the wall behind, not directly into the viewer’s eyes. If the monitor sits very close to the wall (less than 6 inches), the light may create a harsh halo instead of a gentle glow, in that case, angle the strip slightly upward or choose a less powerful option.
Desk backlighting works similarly. A strip along the back edge of the desktop (where the desk meets the wall) creates a floating effect and provides gentle ambient light that complements the monitor backlighting. This is especially effective for sit-stand desks or those with visible cable management trays.
Under Desk and Shelving
Underglow transforms a desk from a piece of furniture into a light feature. Mount LED strips along the front underside edge and optionally along the left and right edges for 180-degree glow. This creates a light pool on the floor that defines the gaming space.
Underglow serves a practical purpose too, it illuminates the keyboard and mouse area without creating screen glare. Set to low intensity warm white, it provides enough light to see peripherals and drinks without distraction.
Shelf lighting highlights collectibles and tech. Mount strips along the underside of shelves, pointing down to illuminate the shelf below, or along the back edge pointing at the wall. Front-mounted strips create glare and look amateurish, keep them hidden when possible.
For glass shelves, edge-lit installation (strip mounted vertically along the shelf edge) creates a unique glow effect as light travels through the glass.
Wall and Ceiling Accents
Wall-mounted panels and vertical light bars add height to setups dominated by horizontal lines. Place panels in asymmetric patterns rather than perfect grids, a cluster to one side creates visual interest, while centered symmetric arrangements often look too formal for gaming spaces.
Ceiling strips work best in dedicated gaming rooms rather than shared spaces. A perimeter strip around the ceiling edge provides indirect lighting that can shift to match game themes or time of day. Warm white in the evening reduces blue light exposure before sleep, while vibrant colors during streaming create energy.
Architectural features like alcoves, recessed areas, or columns benefit from accent lighting that emphasizes their shape. This is more advanced territory but creates professional results when done right.
Avoid placing bright lights directly in the webcam’s field of view. Lights behind the camera (illuminating you) are good: lights behind you create silhouetting and force the camera to adjust exposure incorrectly.
Setting Up and Syncing Your LED Gaming Lights
Installation is usually straightforward, but small mistakes create headaches. Follow these processes for clean results.
Installation Tips and Best Practices
Clean surfaces before applying adhesive strips. Dust, oil, or texture prevents proper bonding and leads to sagging or falling strips within weeks. Use isopropyl alcohol on a microfiber cloth and let surfaces dry completely.
Most LED strips include 3M-style adhesive backing, which works well on smooth surfaces but fails on textured or porous materials. For problem surfaces, use additional mounting clips or aluminum channels. Channels also diffuse light for a more professional appearance and protect the strip from damage.
When cutting strips to length, only cut at marked points (usually every few inches, indicated by scissor symbols and copper contact points). Cutting elsewhere destroys that section. Measure twice, cut once.
Connect sections with solderless connectors or solder joints depending on skill level. Solderless connectors are foolproof but add bulk and potential failure points. Soldering creates permanent, slim connections but requires basic electronics skills and tools.
Test before permanent installation. Power up the full system, check all sections light up correctly, and verify colors match expectations. Finding a dead zone or color mismatch after cable managing everything is frustrating.
Route power cables and data cables cleanly using cable channels, raceways, or adhesive clips. Velcro cable ties allow future adjustments without cutting zip ties. Keep power cables separate from audio cables when possible to avoid electromagnetic interference.
Connecting to Gaming RGB Ecosystems
Ecosystem integration requires compatible hardware and software. For Razer Chroma, you’ll need either native Razer LED products or third-party strips with Chroma RGB certification, connected through a Razer controller or compatible motherboard RGB header.
Corsair iCUE follows a similar model, Corsair Lighting Node PRO serves as the controller hub for LED strips, connecting to the PC via USB and controlled through iCUE software. The software allows per-LED programming if using addressable strips.
ASUS Aura Sync and MSI Mystic Light typically run through motherboard RGB headers (4-pin for standard RGB, 3-pin for addressable RGB). Connecting incompatible LED types to wrong headers can damage the strip or motherboard, so verify specifications before connecting.
Third-party solutions like SignalRGB and OpenRGB unify different ecosystems and add compatibility to off-brand LED strips. They work through reverse-engineered protocols and provide a single interface for mixed hardware setups, though they sometimes lag behind official software in supporting the newest products.
For game sync, most systems require either native game support (built-in Chroma/iCUE integration) or screen capture software. Govee’s desktop app and Philips Hue Sync use screen regions to sample colors and send commands to lights. Performance impact is minimal on modern systems (1-3% GPU usage) but can affect lower-end hardware.
Console gamers have fewer options. Govee DreamView and Philips Hue Play work with console gaming through HDMI sync boxes that sit between the console and TV, reading the HDMI signal to determine screen colors. These add latency (typically 1-5ms) which competitive players may notice.
Popular LED Light Brands and Options for Gamers in 2026
The LED market has matured significantly. These brands consistently deliver for gaming applications.
Budget-Friendly Options
Govee dominates the budget-conscious segment in 2026. Their Govee RGBIC LED Strip Lights (typically $25-$60 depending on length) offer independent color control, app integration, music sync, and decent build quality. They’re not ecosystem-integrated, but the standalone app works well and supports scene customization.
Philips Hue entered the budget space with their Lightstrip Essential line (around $40 for 6.5 feet), offering basic smart features without the premium price of the flagship Lightstrip Plus. Color accuracy isn’t reference-grade, but for ambient gaming lighting, they perform well.
Generic Amazon Basics and Monster LED strips ($15-$30) work for basic bias lighting if you don’t need color changing or smart features. They’re reliable for static white applications but lack longevity compared to name-brand options.
Pros at ProSettings who’ve documented their setups often use Govee for room ambiance while investing more heavily in peripherals that directly affect performance, a sensible budget allocation for competitive players.
Premium and Smart Lighting Solutions
Philips Hue Play Gradient Lightstrip (around $180-$280 depending on TV size) represents the premium tier for screen sync. The gradient feature displays multiple colors across the strip simultaneously, creating more accurate screen extension effects than single-color-zone alternatives.
Nanoleaf Shapes and Canvas panels ($200-$400 for starter kits, expandable with additional panels at $20-$40 each) serve as statement pieces. They’re modular, individually addressable, and work with major smart home ecosystems. The touch-reactive and music-reactive features create interactive installations that respond to presence and sound.
Corsair iCUE Lighting Tower ($130) and LS100 Starter Kit ($180) integrate directly with the Corsair ecosystem. For users already invested in Corsair peripherals and components, this creates the tightest integration possible, game-specific lighting profiles that span keyboards, mice, headset stands, fans, and LED strips.
Razer Chroma Addressable RGB Controller ($50) plus Razer Chroma RGB LED Strips ($40 per 2-meter strip) provide Razer ecosystem integration. While pricier than generic strips, they sync natively with over 250 Chroma-enabled games as of March 2026, including major titles like Call of Duty: Black Ops Gulf War, Valorant, and League of Legends.
LIFX Lightstrip ($80-$100) offers ecosystem-free smart control, no hub required, just Wi-Fi. They’re bright (up to 1,400 lumens), support all major smart assistants, and feature infrared LEDs for better night vision camera visibility if you stream.
Premium options justify their cost through longevity (rated 50,000+ hours vs. 20,000-30,000 for budget options), better adhesives, more accurate colors, and tighter ecosystem integration. Whether those benefits matter depends on how seriously you take your setup aesthetics and whether you’re building for content creation or pure gaming.
Common Mistakes to Avoid When Adding LED Lights
A few recurring errors plague first-time LED installations. Avoiding these saves money and frustration.
Over-saturation: Cranking every LED to 100% brightness creates a disco rather than a gaming space. LEDs should complement the monitor, not compete with it. Start at 30-40% brightness and adjust based on ambient light conditions. Many gamers find they prefer different brightness levels for daytime gaming (50-60%) versus night sessions (20-30%).
Ignoring color temperature: Mixing warm white (2,700K-3,000K) and cool white (5,000K-6,500K) in the same viewing area creates visual discord. Stick to one temperature range or use RGB strips set to specific Kelvin values for consistency. Pure RGB whites often lean slightly blue, if color accuracy matters, dedicated white LEDs or RGBW (RGB + dedicated white) strips produce better neutral tones.
Poor cable management: Visible power cables, controllers, and connection points ruin otherwise clean setups. Plan cable routes before installation and use channels, raceways, or furniture to hide runs. Wireless controllers eliminate some cables but require battery management or charging.
Buying the wrong strip type: RGB, RGBIC, and addressable RGB have different controllers and power requirements. Verify compatibility before purchasing extension strips or replacement sections. A common mistake is buying standard RGB extensions for an RGBIC main strip, they’ll work but lose the independent color zones.
Neglecting power requirements: Long LED runs require more power than short ones. Most consumer LED strips max out around 16 feet on a single power supply. Longer installations need additional power injection points or separate power supplies. Underpowered strips show voltage drop, the far end appears dimmer or displays incorrect colors, especially at high brightness or when showing white.
Mounting in high-heat areas: LEDs themselves run cool, but adhesives fail in high-heat zones. Don’t mount strips directly behind radiators, on top of case exhaust areas, or near heating vents. Heat also degrades LED lifespan, every 10°C increase above rated operating temperature (usually 25°C) cuts lifespan roughly in half.
Forgetting about viewing angles: Strips mounted where they shine directly into seated eye level create glare and discomfort. LEDs should illuminate surfaces (walls, desk undersides, monitor backs) rather than directly entering the field of view. If you can see the individual LED diodes when seated, reposition the strip.
Skipping ecosystem research: Investing $200 in LED lights only to discover they don’t sync with your existing peripherals is disappointing. Before purchasing, verify compatibility with your motherboard RGB headers, peripheral ecosystem (Razer, Corsair, etc.), or smart home platform. Cross-ecosystem setups work but require additional software and sacrifice some features.
Ignoring smart home security: WiFi-connected LED lights are IoT devices with security implications. Use unique passwords, keep firmware updated, and consider network segmentation (separate guest network for smart home devices) to prevent compromised LED controllers from accessing other network devices. It sounds paranoid until you read about botnets recruiting smart bulbs.
Conclusion
LED lighting transforms gaming setups from functional workspaces into immersive environments that enhance both the experience and physical comfort. The difference between a well-lit setup and a poorly lit one isn’t just aesthetic, it’s measurable in reduced eye strain, better immersion, and if you’re streaming, viewer retention.
The right approach balances function and form. Bias lighting behind monitors serves a purpose. Underglow and accent lighting create atmosphere. Over-saturation and poor placement create distraction. Start with one or two key zones, monitor backlighting and desk underglow cover the fundamentals. Expand from there based on your space and how much you care about the final look.
Ecosystem integration matters if you’re already invested in a particular brand. If you’re starting fresh or mixing brands, app-controlled solutions from Govee or Philips Hue offer flexibility without lock-in. Budget or premium, the core principles remain the same: plan your layout, install cleanly, manage cables, and adjust brightness to support rather than compete with your displays.
The best LED setup is the one you stop noticing after the first week, it just feels right every time you sit down to game.