
There’s nothing more frustrating than settling in for a long gaming session, only to find yourself slowly sinking toward the floor like you’re descending into quicksand. You adjust the height lever. You rise. You start playing. Five minutes later, you’re back down again. If your gaming chair keeps going down on its own, you’re not alone, this is one of the most common complaints among gamers, and it’s not just annoying. It can wreck your posture, throw off your aim, and turn what should be hours of comfort into a session of constant readjustment.
The good news? This problem is almost always fixable, and you don’t need to be a mechanical engineer to solve it. Whether your chair is dropping because of a worn gas cylinder, a pressure seal failure, or just cheap construction, there are clear solutions, from quick DIY fixes to full part replacements. This guide will walk through exactly why gaming chairs sink, how to stop it from happening, and what to look for to avoid the problem in the future.
Key Takeaways
- A worn or damaged gas cylinder is the most common reason your gaming chair keeps going down, with typical lifespan of 2-4 years in mid-range models and under a year in budget chairs.
- Quick fixes like hose clamps, PVC pipe sleeves, or duct tape can temporarily stop your gaming chair from sinking, but replacing the gas cylinder is the permanent solution.
- Replacing a gaming chair gas cylinder takes 15-30 minutes and costs $20-40, making it a cost-effective repair if your chair is otherwise in good condition.
- Choose a replacement gas cylinder with Class 3 or Class 4 certification and ensure it matches your weight capacity to prevent premature failure of your gaming chair.
- Proper maintenance like wiping the piston rod monthly, avoiding sudden drops, and staying within weight limits can extend your gaming chair’s cylinder lifespan to 5+ years.
Understanding How Gaming Chair Gas Lifts Work
Before diving into fixes, it helps to understand what’s actually happening under your seat. Gaming chairs use a pneumatic cylinder (also called a gas lift or gas spring) to handle height adjustment. When the lever is pulled, it opens a valve inside the cylinder that allows compressed nitrogen gas to move between chambers, letting the piston rise or fall based on the weight applied.
When everything’s working correctly, the valve closes once you release the lever, locking the piston in place. The pressurized gas supports your weight and keeps the chair at your chosen height, whether you weigh 120 pounds or 250 pounds (within the cylinder’s rated capacity).
The Anatomy of a Pneumatic Cylinder
A standard gaming chair gas cylinder consists of several key components:
- Outer cylinder tube: The metal casing that houses the internal mechanism
- Piston rod: The shaft that extends and retracts to adjust height
- Valve mechanism: Controls the flow of gas between chambers when the lever is engaged
- Pressure seal: Rubber or plastic O-rings that keep the nitrogen gas from escaping
- Nitrogen gas chambers: Two compartments separated by the valve, filled with compressed nitrogen (not air)
The entire system relies on maintaining gas pressure and an airtight seal. When either fails, the chair can no longer hold your weight at the set height, and gravity wins. That’s when you start experiencing the slow, inevitable descent.
Common Reasons Your Gaming Chair Won’t Stay Up
Chairs don’t sink for fun. There’s always a mechanical reason, and identifying the culprit will determine whether you need a $20 fix or a $200 replacement.
Worn or Damaged Gas Cylinder
This is the number one cause. Over time, the internal seals and valve components wear down from repeated use. If you adjust your chair height multiple times per day, you’re cycling the valve mechanism thousands of times per year. Eventually, the valve stops closing fully, or the piston develops microscopic scoring that prevents a perfect seal.
Typical lifespan for a gas cylinder in a mid-range gaming chair is 2-4 years with regular use. Budget chairs might fail in under a year. High-end cylinders (Class 4 rated) can last 5+ years.
Pressure Seal Failure
Even if the valve works perfectly, the pressure seals (O-rings) around the piston can degrade. These rubber or silicone rings create the airtight barrier that keeps nitrogen gas from leaking out. Exposure to heat, humidity, or just age can cause them to crack, harden, or lose elasticity.
When seals fail, you’ll often hear a faint hissing sound as you sit down, or notice the chair sinks faster when you first sit than it does later in the session (because the gas has already escaped).
Weight Limit Exceeded
Most gaming chairs list a weight capacity between 250-330 pounds, but the gas cylinder itself usually has its own rating, often lower than the chair’s advertised limit. If you’re close to or over that threshold, the cylinder is under constant strain. Many gaming setup tutorials emphasize checking weight ratings before purchase, but it’s easy to overlook the cylinder spec buried in fine print.
Exceeding the limit doesn’t always cause immediate failure, but it accelerates wear. A 200-pound user might get four years out of a cylinder: a 280-pound user might get 18 months.
Manufacturing Defects and Quality Issues
Budget gaming chairs (under $150) often use the cheapest possible gas cylinders, sometimes unrated or counterfeit Class 2 units that lack proper safety certifications. These can fail within weeks of normal use.
Defects to watch for include:
- Cylinders that sink only when cold (poor seal tolerance)
- Chairs that drop in bursts rather than smoothly (valve sticking)
- Premature failure within the first 6 months (poor quality control)
If your chair is brand new and already sinking, don’t bother with DIY fixes, contact the manufacturer for a warranty replacement.
Quick Fixes to Stop Your Gaming Chair from Sinking
If you need to keep gaming and can’t wait for a replacement part to arrive, there are a few temporary fixes that can buy you days or even weeks. None of these are permanent solutions, they’re band-aids. But they work.
The Hose Clamp Method
This is the most popular quick fix. You’re essentially creating a physical stop that prevents the piston from retracting.
What you need:
- 1-2 large hose clamps (2-3 inch diameter)
- Screwdriver or drill
How to do it:
- Adjust your chair to the desired height
- Slide a hose clamp onto the exposed piston rod (the chrome shaft between the chair base and the seat mechanism)
- Position the clamp just below the seat mechanism’s entry point
- Tighten the clamp until it’s snug against the piston, this creates a physical barrier
- Test by sitting down: the clamp should prevent further descent
Add a second clamp if the first one slips. The downside? You lose height adjustability completely. Your chair is now locked at one height until you remove the clamp.
The PVC Pipe Sleeve Solution
This method is cleaner and more stable than hose clamps, but requires a quick trip to a hardware store.
What you need:
- PVC pipe (1.5-2 inch inner diameter, depending on your piston size)
- Saw or PVC cutter
How to do it:
- Measure the exposed length of your piston rod when the chair is at your preferred height
- Cut a section of PVC pipe to that length
- Split the pipe lengthwise with a saw so you can open it and slide it onto the piston
- Position the pipe around the piston shaft, then let the chair settle onto it
The PVC acts as a spacer, bearing your weight instead of the failed gas cylinder. It’s more durable than hose clamps and distributes pressure more evenly. You can even wrap it in foam or tape to reduce noise.
Duct Tape Temporary Fix
This is the absolute last resort for emergency situations, think mid-tournament when you can’t leave your setup.
How to do it:
- Set chair to desired height
- Wrap duct tape tightly around the piston rod in multiple layers, building up thickness
- Continue wrapping until you’ve created a thick collar that can’t slip past the seat mechanism opening
This usually lasts a few hours at most before the tape compresses or slides. It’s not pretty, but it’ll get you through a raid or ranked session.
How to Replace Your Gaming Chair Gas Cylinder
Replacing the gas cylinder is the real fix. It’s easier than most people think, and you don’t need specialized tools. Total time: 15-30 minutes.
Tools and Materials You’ll Need
- Replacement gas cylinder (we’ll cover specs in a moment)
- Rubber mallet or hammer
- Pipe wrench or large adjustable wrench (optional but helpful)
- WD-40 or penetrating oil
- Protective gloves and safety glasses (gas cylinders are under pressure)
- Towel or old cloth (things can get greasy)
Step-by-Step Replacement Guide
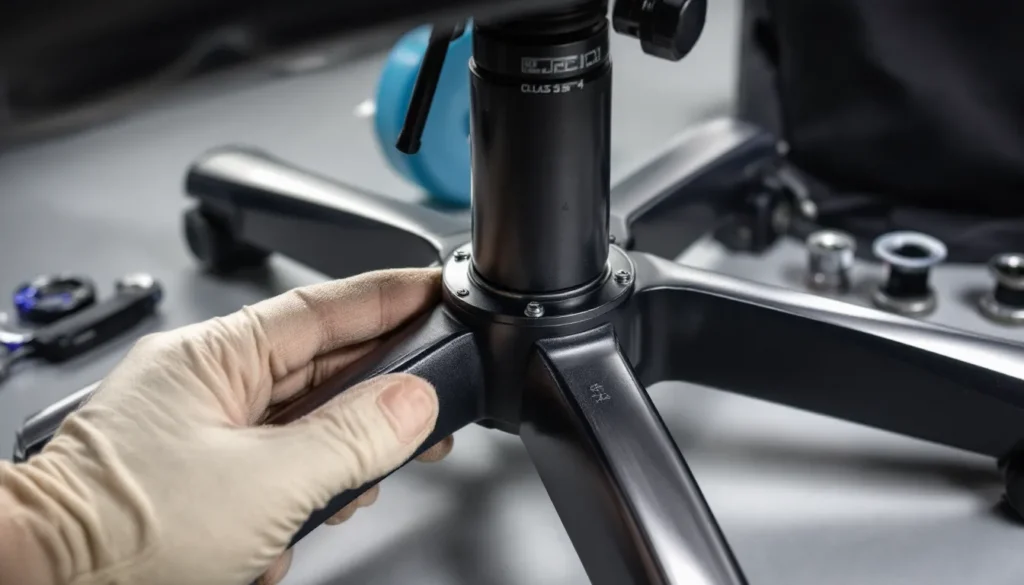
Step 1: Remove the chair base
Flip the chair upside down. You’ll see the 5-star base connected to the bottom of the gas cylinder. Most cylinders use a tapered fitting, no bolts, just friction.
Strike the underside of the center hub (where the cylinder enters the base) with a rubber mallet. Hit it firmly in a circular pattern. After a few strikes, the base should pop off the cylinder. If it’s stubborn, spray WD-40 around the joint and wait 10 minutes.
Step 2: Separate the seat from the old cylinder
Now remove the seat mechanism. The top of the cylinder fits into a socket in the seat’s metal frame. With the seat still upside down, pull the lever to release any remaining pressure.
Strike the metal plate around the cylinder socket from underneath with the mallet. You’re trying to knock the cylinder out of the seat. This usually takes more force than removing the base. Be patient and keep striking in different spots around the perimeter.
Step 3: Install the new cylinder
Once the old cylinder is out, take a moment to clean any dust or debris from the base and seat sockets. Insert the tapered end of the new cylinder into the chair base, it should slide in and seat with a firm push. Then insert the top end into the seat mechanism socket. Again, a firm push should lock it in place.
Step 4: Reassemble and test
Flip the chair right-side up. Sit down gently to fully seat all the connections. Test the height adjustment lever. The chair should rise and lock solidly at any height.
Choosing the Right Replacement Cylinder
Not all gas cylinders are created equal. Here’s what to look for:
Class rating: Gas cylinders are rated Class 1 through Class 4 based on safety and quality. Class 3 or Class 4 are recommended for gaming chairs, they meet stricter pressure and durability standards. Avoid unrated or Class 1 cylinders.
Length: Measure your old cylinder from end to end. Standard sizes are 4-inch, 5-inch, and 6-inch stroke lengths. The stroke length determines your height adjustment range. Most gaming chairs use 4-inch or 5-inch.
Diameter: The tapered fittings are usually standard (2-inch base, 1.1-inch top), but confirm your chair’s specs if possible. Universal cylinders fit 95% of chairs.
Weight capacity: Look for cylinders rated for at least 50 pounds over your body weight for longevity.
Expect to pay $20-40 for a quality replacement cylinder. Many gaming gear reviews recommend keeping a spare on hand if you’re serious about your setup, it’s cheaper than emergency shipping.
When to Repair vs. Replace Your Gaming Chair
Just because you can replace the cylinder doesn’t always mean you should. Sometimes the chair itself isn’t worth saving.
Cost-Benefit Analysis
Do the math:
- Quality replacement cylinder: $25-40
- Your time: 30 minutes to 1 hour (depending on how stuck the old cylinder is)
- New budget gaming chair: $100-200
- New mid-tier gaming chair: $250-400
If your chair cost under $150 and is more than 3 years old, and the cylinder replacement costs $40 after shipping, you’re looking at a 25-30% investment in a chair that’s already showing age. That’s borderline.
If your chair cost $300+ and is otherwise in good condition (solid frame, intact upholstery, working recline mechanism), a $30 cylinder swap is absolutely worth it.
Signs Your Chair Is Beyond Repair
Replace the whole chair if you notice:
- Cracked or bent seat pan: The metal or plastic base that supports the cushion is structurally compromised
- Broken recline mechanism: If the tilt lock or recline adjuster is broken, parts are often chair-specific and expensive
- Severe upholstery damage: Torn PU leather or fabric that’s separating from the foam
- Wobbly armrests or backrest: Indicates frame damage or worn mounting points
- Multiple cylinders have failed: If you’re on your second or third cylinder replacement, the seat mechanism itself is probably causing premature wear
Basically, if the chair has multiple problems and you’re not emotionally attached to it, cut your losses.
Preventing Future Gas Cylinder Failures
An ounce of prevention beats a pound of hose clamps. Here’s how to extend the life of your gas cylinder and avoid the sinking chair problem in the first place.
Proper Weight Distribution and Usage
Avoid sudden drops. When you sit down, lower yourself into the chair rather than plopping down with full force. Every hard impact compresses the gas cylinder at maximum speed, wearing the valve and seals faster.
Don’t use the height adjustment as a fidget toy. Some people constantly raise and lower their chairs out of habit. Each cycle wears the valve. Adjust when you need to, then leave it alone.
Stay within weight limits. This sounds obvious, but it’s worth repeating: if you’re close to the chair’s rated capacity, upgrade to a heavy-duty model rated for 350+ pounds. The extra $50-100 is cheaper than replacing cylinders every year.
Regular Maintenance Tips
Gaming chairs need almost zero maintenance, but a couple of small habits go a long way:
- Wipe down the piston rod monthly: Dust and grime on the exposed chrome shaft can get pulled into the cylinder seals, causing premature wear. A quick wipe with a damp cloth keeps things clean.
- Check for loose bolts quarterly: A wobbly seat puts uneven stress on the cylinder. Tighten the seat mechanism bolts and base screws every few months.
- Keep the chair away from heat sources: Radiators, space heaters, and direct sunlight can degrade rubber seals inside the cylinder.
Choosing a High-Quality Gaming Chair from the Start
This is where it really matters. A $100 chair with a garbage cylinder will fail. A $300 chair with a Class 4 cylinder will last for years.
Look for brands that explicitly mention gas cylinder quality in their specs. If the product page doesn’t say “Class 3” or “Class 4,” assume it’s Class 2 or unrated. Reviews on tech accessory sites often call out cylinder quality (or lack thereof) after long-term testing.
Brands known for durable cylinders include Secretlab, Herman Miller (for the high-end crowd), Noblechairs, and certain models from DXRacer and Corsair. Budget brands like Homall and GTRacing are hit-or-miss, some units last, others fail in months.
What to Look for When Buying a Durable Gaming Chair
If you’re in the market for a new chair or upgrading from a failing one, here’s what separates chairs that last from chairs that sink.
Gas Cylinder Quality Standards
As mentioned earlier, Class 3 or Class 4 certification is non-negotiable for serious use. These ratings (set by organizations like BIFMA and SGS) test cylinders for:
- Pressure stability under load
- Seal integrity over time
- Resistance to impact and shock
- Safety in case of catastrophic failure (Class 4 cylinders have reinforced casings to prevent explosions)
A Class 4 cylinder costs manufacturers about $10-15 more than a Class 2. That’s the difference between a chair that lasts 5 years and one that lasts 18 months. Some manufacturers will list this in specs: others bury it. If you can’t find the info, contact customer support before buying.
Weight Capacity Ratings
Don’t just look at the overall chair weight limit, ask about the cylinder’s specific rating. Some chairs advertise “300 lb capacity” but use cylinders rated for 250 lbs. The difference gets absorbed by the frame and seat, but the cylinder still wears faster.
Ideal setup:
- If you weigh 150 lbs, a 250 lb cylinder is plenty
- If you weigh 200 lbs, look for 300 lb+ rated cylinder
- If you weigh 250 lbs+, get a chair explicitly marketed as “heavy duty” with a 350-400 lb cylinder
Warranty and Customer Support
A solid warranty signals confidence in build quality. Look for:
- Minimum 2-year warranty on the gas cylinder (many premium brands offer 3-5 years)
- Responsive customer support that will send replacement parts without a fight
- Easy parts availability so you can order a new cylinder in 3 years if needed
Secretlab, for example, offers a 5-year warranty and has replacement cylinders available for purchase separately. Budget brands often disappear after a year, leaving you with no recourse when parts fail.
Read warranty fine print: some cover “manufacturing defects” but exclude “normal wear,” which is useless for a cylinder that naturally wears out. The best warranties explicitly cover the gas lift for a set period, no questions asked.
Conclusion
A sinking gaming chair is annoying, but it’s rarely a mystery. In most cases, it’s a worn gas cylinder, a part designed to wear out eventually, especially in budget chairs. The good news is that whether you need a quick hose clamp fix to finish a gaming session or a full cylinder replacement for a long-term solution, you’ve got options that don’t require professional help or a new chair purchase.
If your chair is otherwise solid, spend the $30 and 30 minutes to swap the cylinder. If it’s falling apart in multiple ways, invest in a higher-quality replacement with a Class 4 gas lift and a real warranty. Either way, you’ll be back to gaming at the right height, and staying there.